Saturday, November 8, 2014

This weeks creations! Roses and polka dots, summery stripes and houndstooth pattern

Hello friends!

Just a quick post today. I did 3 looks this past week, so I thought I would share them with you here. I did some stamping on one look, but for the other 2 looks, I have been working on my hand painting skills. So here they are.

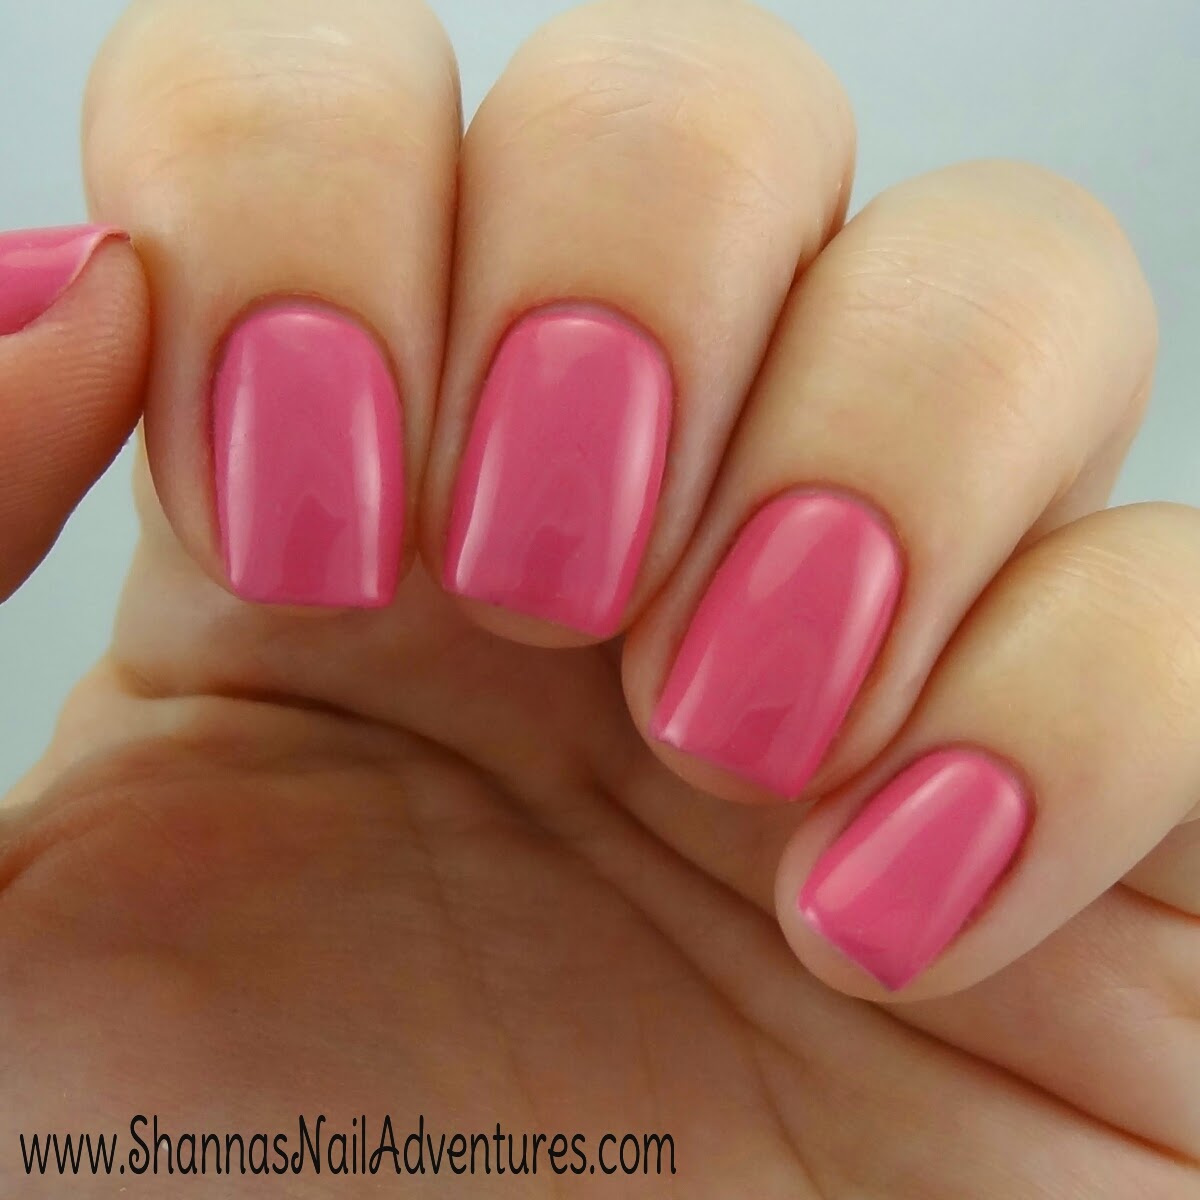
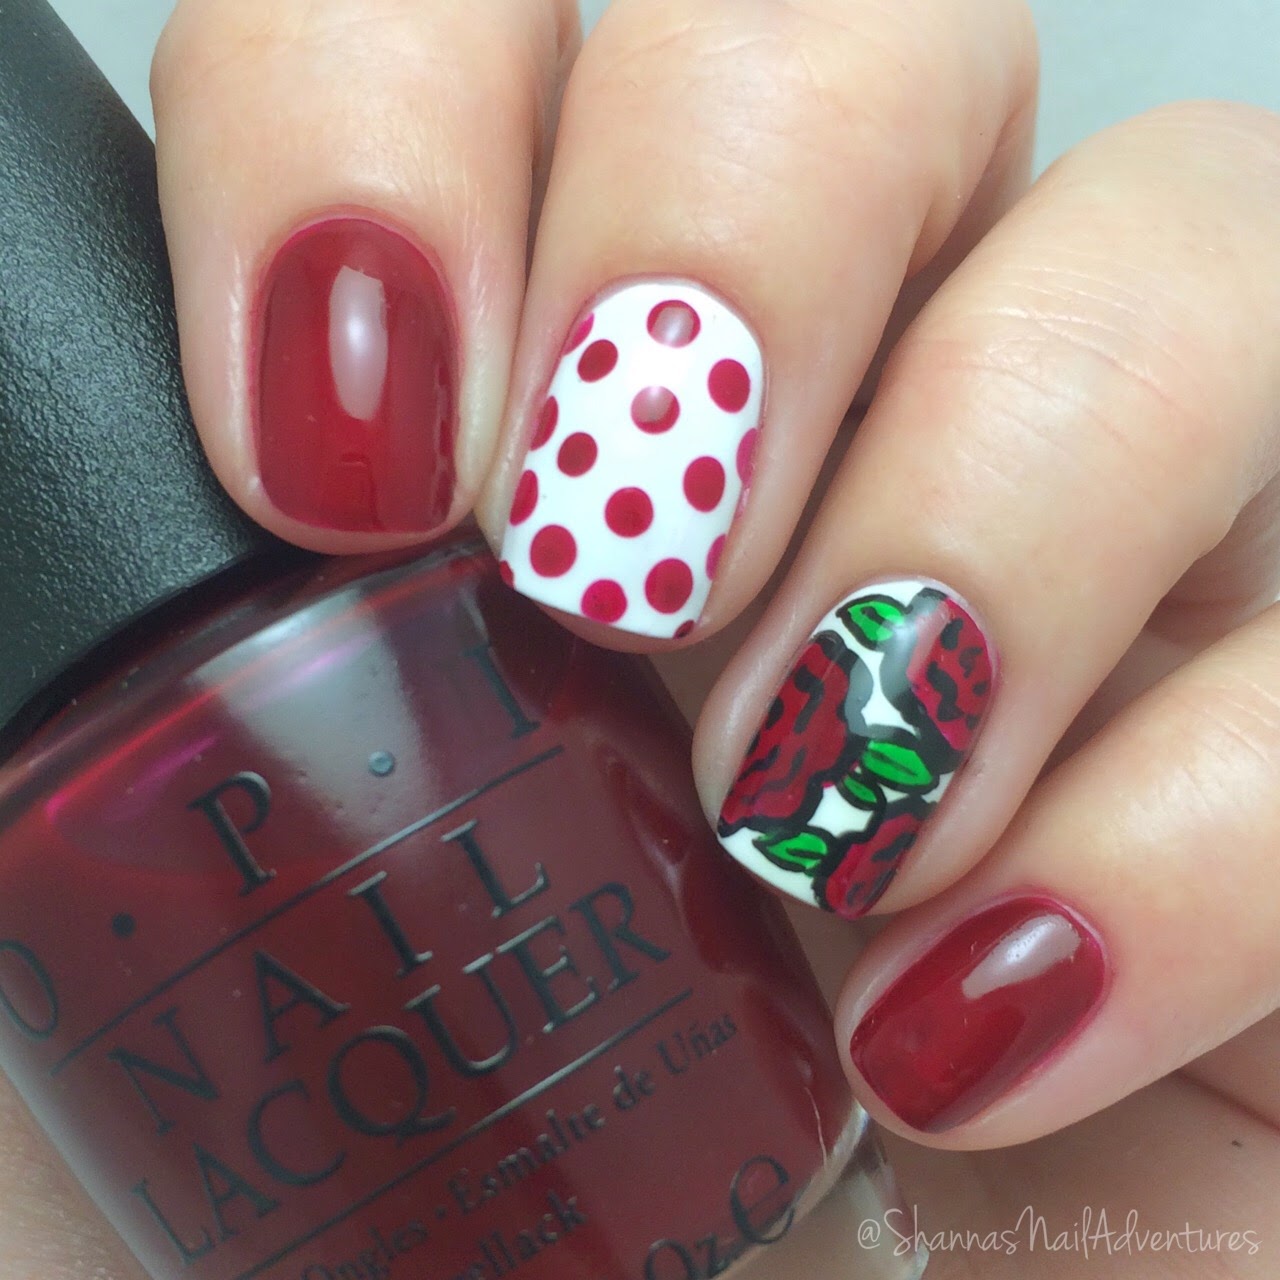
My first look is the most recent. I did this one today. For this look I used one of the new holiday colors from the OPI Gwen Holiday collection. It is called, "In a Holidaze". (Keep checking back, because I have the whole collection, and will be swatching them all for you soon!)

I hand painted the roses with the same color and outlined in black acrylic. The green leaves are also green acrylic. Then I used a dotting tool to create the polka dots. The white base is OPI "Alpine Snow".


This next picture is very summery since the weather here has been in the 80's. I used China Glaze colors for this look called, "Too Yacht to Handle"(Teal), "Bottoms Up"(Pink) and "Are You Jelly"(Purple). The glitter accent is by Sally Hansen and is "Big Glitter". I hand painted the little stripes with all the colors above (minus the glitter). Then I added neon pink studs. 


Then, I added a bow later. Here is the shot with the purple box. :)
Also, this picture was taken outside. 


And lastly, my stamped design. I used OPI "Coca Cola Red" and "My Favorite Ornament"(Glitter). Added some gold studs and some black stamping with a houndstooth pattern, and viola. I really liked this look. 


Hoped you all liked seeing last weeks creations! Let me know if you have any questions! 

Have a wonderful week!!

Love, 
Shanna

Sunday, November 2, 2014

PurJoi Nail Studio Swatches and Nail Art

Hello my lovely friends!

I had the pleasure of swatching 3 colors of the new ONE-STEP Gel by PurJoi Nail Studio. I was super excited to try out this product because, well duh, its one step! No base or top coat is required! 
Awesome right!? 

It's also 3 free which means it's free of Formaldehyde, DBP, and Tolueneno and it's made here in the USA. The owner Joi is actually based here in the Bay Area! :-) 

Here are the 3 colors I swatched:


Start by cleaning you nails, filing to the shape you like, and using a fine grit file to lightly buff your nail and remove any shine.

Then use alcohol or a bonder to clean and dehydrate the nail before application.

Pick your color and start painting!

This formula is a great consistency. It isn't too thin or too thick. You get full coverage in 2-3 coats (I got it in 2 coats for all 3 colors, but added one more coat for strength.) This one-step gel does need to be cured under a UV/LED lamp for 60 seconds each coat. It drys shiny with no tackiness.

The color below is called Fairy Dust. The top picture is taken outside in the sunlight because the pictures in my light box were not doing it justice (2nd picture). It is a mauve pink and has plenty of glitter to make is shine in the light. I really like this color! Application was good, but I had a tiny bit of shrink back at the tips (but this happens with most gel polishes). Otherwise, it's brilliant!


The next color I swatched is called "Spring Break" and is a fun and bright green color. 
I really liked this color as well.  This first picture is a outdoor shot. 


And this 2nd picture is in my light box with some hand painted nail art using the 3rd gel color I will be showing you called, "Precious Moments". I didn't use a top coat which is why it has a textured look. But this was my first time doing nail art with gel and it turned out okay. Haha. 


The last color I swatched, as mentioned above is called, "Precious Moments". It is the perfect pink and I can see myself using this one often for the base of some cute nail art to come.


The color was so bright and fun, that it reminded me of flamingos.
So....I went tropical with my nail art. 


I just want to mention again, I used 3 coats in all the pictures above even though you really only need two. But if you have nails like me (thin and brittle) and need a little extra strength, use 3 coats. 

Also - PurJoi does offer a  High Gloss Clear top coat which I may need to try in the future. Even though these polishes dry glossy, I am in love with UBER glossy, and these just don't give that high shine alone. 

I found removal to be normal with any other gel polishes I have used. They soak off in 10-15 minutes. (Glitter can take up to 20 minutes) For my removal process, I first file the gel polish enough to remove the shine. Then I use a cotton ball soaked in pure acetone and wrap my nails in foil. I pull off the foil and check the polish at 10 minutes. If it doesn't come off easily, I soak an additional 3-5. 

You can go to www.PurJoiNailStudio.com to buy your polish. The price is $17.99 per bottle.  
And they ship internationally.

If you can wait until November 11th, you can get 30% off your entire order for 1 day only in honor  of Joi's Birthday! 

I hope you enjoyed seeing these swatches! I really love this product and hope to get more colors in the future to show you. PurJoi Nail Studio just launched, so I'm sure in future there will be tons more colors to choose from, though there is currently already 50! 
Go check out the website and take a looksy!

Have a great day friends! And thank you so much for reading!

Shanna


Sunday, October 19, 2014

Zoya and Fun Lacquer Jazzy Nude manicure

Hello there friends! 

Long time, no post. I know. I'm back though, and today I have a jazzed up nude manicure. I really love how this look turned out.


I used Zoya Spencer as my base. It's a rich taupe color and was opaque in just 2 coats. (One of the things I adore about Zoya polishes) 

Then I used a indie polish brand called Fun Lacquer in Queen on my accent nail. This silver polish is packed with glitter and was opaque in 2 coats as well. It is AMAZEBALLS!! I have the gold partner to this polish called King and will show you in another post. These are the only 2 polishes I have from this brand so far, but I want more. They are brilliant!

I then stamped my middle finger using Konad black and MoYou London stamping plate Fashionista-05. 

Topped it all off with a cute bow I got at my local nail supply store and some little black studs.

I hope you like it! I did. I was showing it off at work to all my co-workers. LOL. :)


Have a great week everyone!!!

Love, 
Shanna

Sunday, September 28, 2014

Manicure using Bundle Monster Gel Nail Art Stamp Stickers

Hello all!

I hope your weekend has treated you well. Mine has been very relaxing and I got a bit lazy, so I figured it was the perfect time to try out the Gel Nail Art Stamps the Bundle Monster sent me to review. Here is what they look like:


The come in a package of 8. Four designs, 2 of each design. You have to cut out the design to the  size of your nail. Its great because I got all 5 nails with one stamp! Now, you may have to use both if you have larger/longer nails then me - which is totally possible. Mine are little stubs right now.


For these 2 looks, I used the "Wallpaper" Gel Art Stamp Stickers. They sent me 3 additional sets to play with, but I will show you those designs in a bit. First, I want to explain what these are and how they work. 

First of all, they really work best over gel polish, BUT - I really don't see why it wouldn't work on a regular coat of white polish that is top coated. I will have to test that out. 

Step 1: Paint your nails with a white base. (gel or lacquer). For mine, I used Bundle Monster white gel from their Gel Basics Collection. You can find it here.


Step 2: Get some water in a bowl, and a cotton ball.


Step 3: Decide which design you want to use. If you are like me, this may be the hardest step.  :) 

Step 4: Cut the sticker to the size of your nail - the closest you can get. 


Step 5: Remove the plastic film covering the design, then place the image on your nail, pressing down to try to get it set on your nail as much as possible. (Think temporary tattoo, but for you finger nails, it is the same thing - like exactly. You are just putting the design on your nail instead of skin.)


Step 6: Dip your cotton ball in the water and place onto the backside of the design. Hold it there for 30 seconds or so or until the paper starts to slide off the design. 


Step 7: Remove the paper and pat it carefully down with your finger. Clean up the edges with acetone based nail polish remover and a q-tip or a clean up brush. (My favorite is ELF Concealer brush.)


Step 8: Top coat these gorgeous babies!

And VIOLA! Beautiful nails that I didn't have to sit and paint for an hour - because as I mentioned above. I was lazy this weekend. Heeheehee. 


Here are the other designs I received. I look forward to using these ones too! 

This one is called Sepia and is $2.50 and you can get it here.


This one is called Love and is $2.20 and you can get it here.


This one is called Kaleidoscope, is $2.50 and you can get it here.

I hope you enjoyed this post. I thought these were very fun and easy to use! Which look do you like? Would you be willing to try out this kind of nail art? If you decide to try, these can be found on BundleMonster.com. 

Thanks for reading! 
Take care, 

Shanna


Sunday, September 21, 2014

Under the Sea manicure using Bundle Monster Sun Kissed Collection and Swatches of 10 plates

Hello friends!

Today I have another look I created using the Bundle Monster 2014 Sun Kissed nail stamping plate  collection I previously posted about here. I also stamped each plate onto paper so you can see all the designs and how well they stamp.

First though - here is my "Under the Sea" design using BM-501 and BM-510. (See below for the plate images.)


For this look I used OPI Glitter off around my cuticles, then let that dry. I then sponged on two nail polish colors, Sally Hansen "Pacific Blue" and China Glaze "Turned Up Turquoise". The result reminded me of the ocean. 


I then used BM-501 and BM-510 and Konad Black and stamped on the design as I liked I really like how the design turned out. I then topped off the design with my favorite top coat, Seche Vite. 
What do you think?


As I promised, here are all the swatches of the fabulous designs, because if you wait for me to do them all on my nails, it's going to take forever! Haha. There are 10 plates total in this collection. 

Here are the Sun Kissed, BM-501 designs:
Under the sea designs, and cute fish! 


Here are the Sun Kissed, BM-502 designs:
Cute mermaidy designs, water, a boat and some cute fish.


Here are the Sun Kissed, BM-503 designs:
Sharks, starfish, fish skeletons, clam, and turtle.


Here are the Sun Kissed, BM-504 designs:
Fun water toys, jelly fish, waves, crustaceans, a lone jelly, and a lifesaver.


Here are the Sun Kissed, BM-505 designs:
Multiple shell designs, sand dollars, and bubbles.


Here are the Sun Kissed, BM-506 designs:
Star design, lighthouse full image, water design, octopus tentacles, sea hours, and lighthouse. 


Here are the Sun Kissed, BM-507 designs:
Kites, cold treats, hibiscus flowers, compass, drinks, and hut.


Here are the Sun Kissed, BM-508 designs:
Flying birds, sunglasses, travel words, pirate hat, flamingo, and pirate head. 
(This plate had the only problem, the flamingo wasn't totally etched. You can see the missing spot on his back.)


Here are the Sun Kissed, BM-509 designs:
Triton's, water, anchors, rope, sand castle, and pirate skull. 


Here are the Sun Kissed, BM-510 designs:
Tattoo design, mermaids, palm tree, hula dancer, treasure map, and sea plant life. 


I really like this set. It has beautiful designs that can be used in so many ways. I can't wait to continue to create with them. Do you have any suggestions? What would you like to see now that you've seen all the plates?

You can purchase the plates at www.bundlemonster.com


Have a great week everyone!

Shanna


Monday, September 15, 2014

Pastel Rainbow Chevron nails and School Nails

Hello my friends!

I hope you are all well. Today I have 2 nail posts for you for days 10 and 13 of the September nail art challenge I am doing on Instagram.

The first design is for day 10. The challenge was "chevron" nails.  Here is the finished look! :) I like how they turned out.


For this look I first painted my nails with a white base coat. Then I used some chevron nail vinyls that I got here. I placed them on each nail in the design I liked. Then I chose 5 colors of polish to my liking. For this I used LeChat colors. (I will post the colors below) and put a drop of each color on a sponge and dabbed them on my nails. I then removed the vinyls and topped it off with Seche Vite top coat.


The colors I used, shown above are LeChat Perfect Match in Happily Ever After(yellow), Butterflies(purple), Rock Candy(blue), Cotton Candy(pink) and Moon River(green). I bought these all at my local nail supply store but you can also find them online on Amazon.com. They come as a set, both gel polish and regular. So you can match your toes to you nails! Or just use the regular polish at times like these. :)


For day 13, the nail art challenge was "school" nails. For this design, I used a white base coat, then applied a top coat. I then hand painted all the designs with acrylic paint. Once finished, applied another coat of top coat. And voila, here is my finished look.


Which one of these 2 looks is your favorite?


I hope you enjoy the rest of your week!

Take care,
Shanna

Saturday, September 13, 2014

September Nail Art Challenge

Hello there friends!

I hope you are all having a nice weekend. Me, I was catching up on some nail designs for @Californails monthly nail art challenge on Instagram. The way the challenge works is that about every 3 days there is a different design that you are to do. You interpret it however you want, and it's fun to see what designs people come up with.

Here is the challenge:


So far I have done day day 1, simple. I used my pink Bundle Monster gel polish and stamped the top with MoYou London Bridal plate-06 for the lace. Then I added a little rhinestone that I got at Michael's. Here is the picture. 


Then day 4 was cat nails. I got inspiration from Pusheen, a cute little fat cat.  This was hand painted with acrylics over my blue Bundle Monster gel polish. Here is my design. 


Day 7 was triangles. I used Orly Luxe for the gold, LeChat Just Breathe for the tan, and for the triangles I polished a plastic bag with the pink, green and gold, top coated it and let it dry. Once completely dry, I peeled it from the plastic, layered them and cut the little triangles using cuticle scissors. I then painted the nail white, top coated it, and placed the triangles where I wanted them. Then, I finished it all off with my favorite top coat, Seche Vite.


This is where I am at so far. I will post the next 3 mani's in this challenge in a few days. I hope you liked these. Which is your favorite??

Love,
Shanna